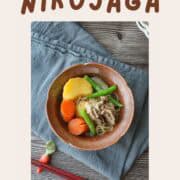
Make authentic nikujaga with simple steps and no dashi! A light, savory stew that lets the natural flavors of meat and veggies shine.
My mom loves cooking and she’s really good at it. Nikujaga is one of the dishes I always ask her to make when I go back to Japan. It’s one of those ofukuro no aji, comfort foods that remind you of your mom and home.
I made my own version to recreate the flavor I grew up with, while keeping it simple and letting the ingredients speak for themselves.
You can enjoy nikujaga with a bowl of rice, either as a side dish or a main, along with other dishes like grilled fish, shira-ae, sunomono, and miso soup.
Why You'll Love This Recipe
- No Refined Sugar: Nikujaga is usually made with sugar, but I use maple syrup instead. It adds a gentle, natural sweetness that makes the dish feel lighter.
- No Dashi Needed: You don’t need dashi to make a delicious nikujaga! Many recipes call for it, but the vegetables release plenty of umami and sweetness as they simmer. This makes the recipe simpler and really lets the ingredients shine.
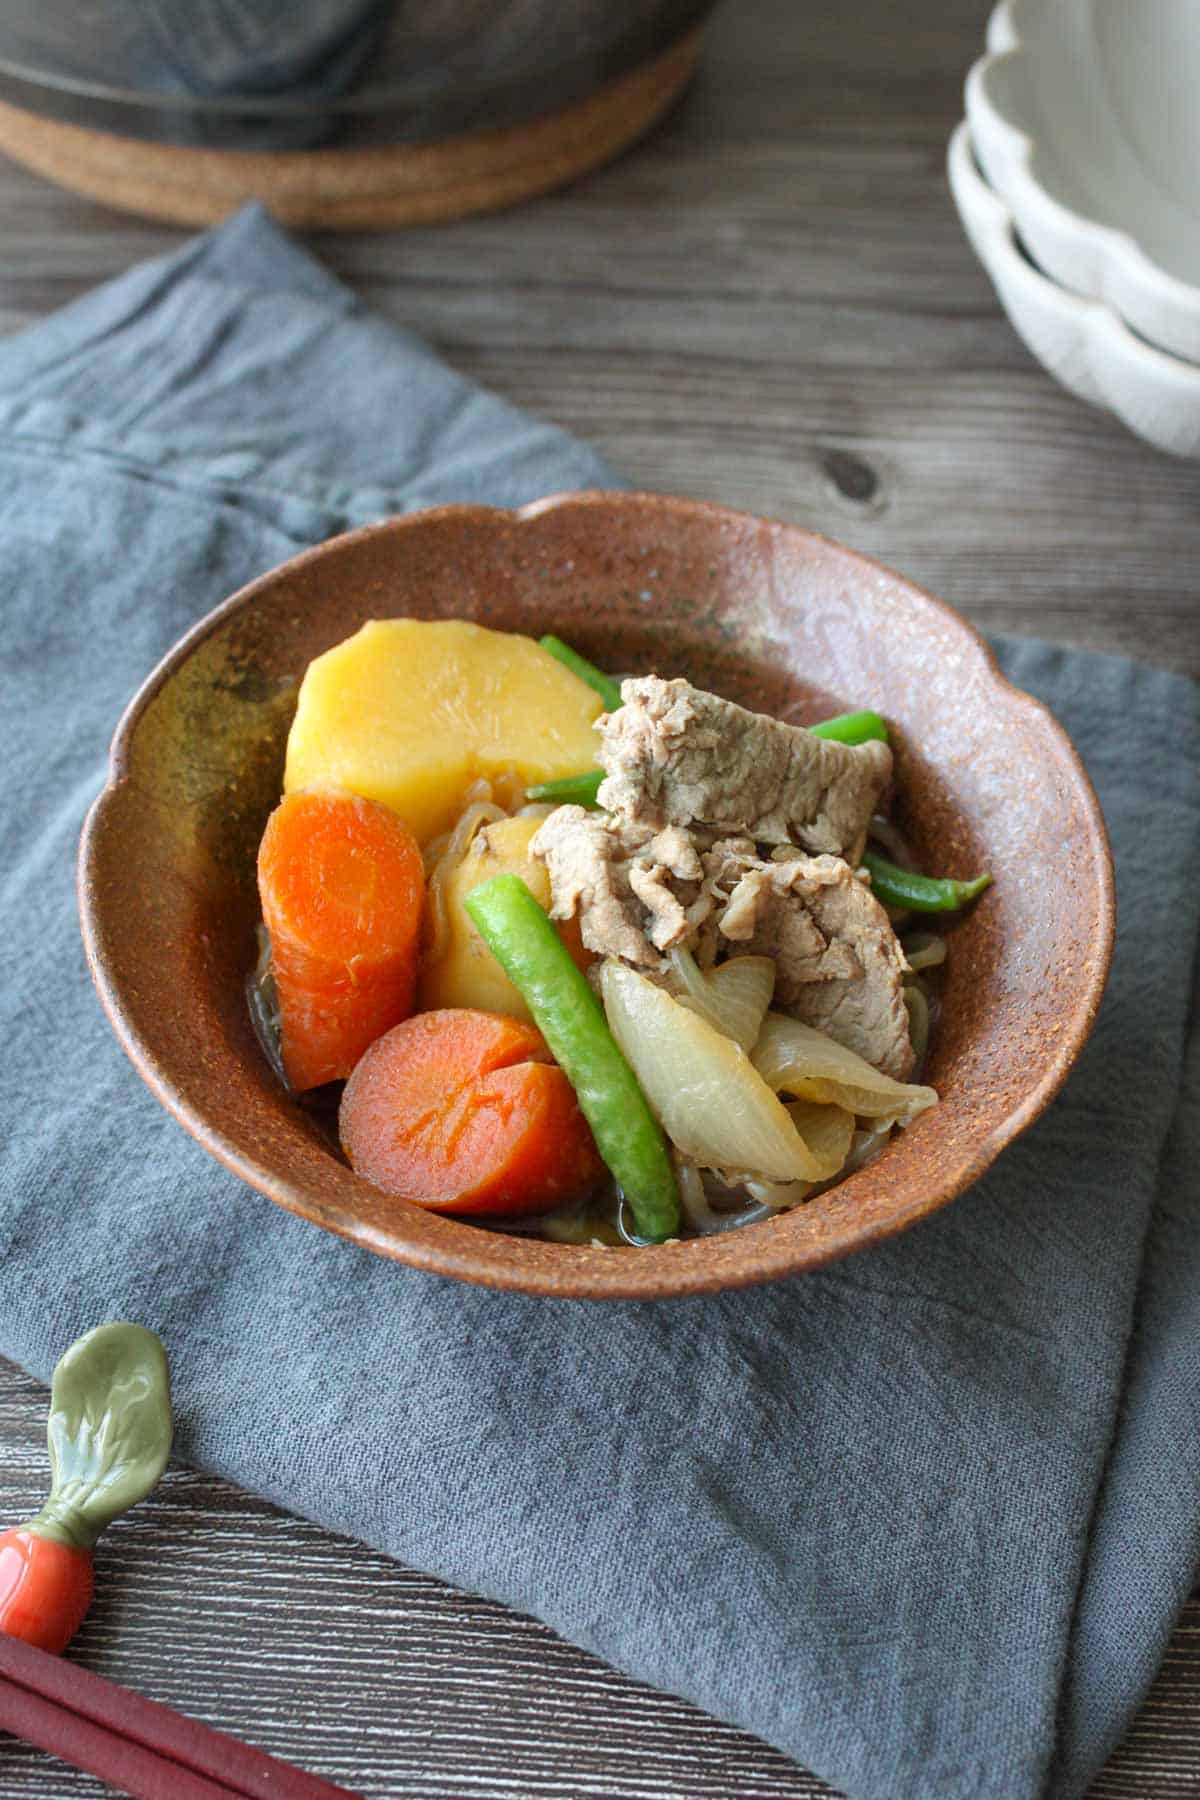
- Tender Meat: The sliced meat is added at the end, so it stays soft and doesn’t get overcooked.
- Flavorful, Fluffy Vegetables: We’ll use just enough cooking liquid to avoid watery vegetables and help them hold onto their flavor and texture. It’s a sweet spot between steaming and simmering, and it keeps everything evenly cooked and delicious.
- Simplified but Flavorful: I’ve removed steps like trimming veggie edges and stir-frying the ingredients at the beginning, because they’re not really necessary (see Kurumi’s Tips for why!). This makes the recipe easier and quicker, without losing any of the classic flavor.
Notes on Ingredients
See the recipe card for the full ingredients list.
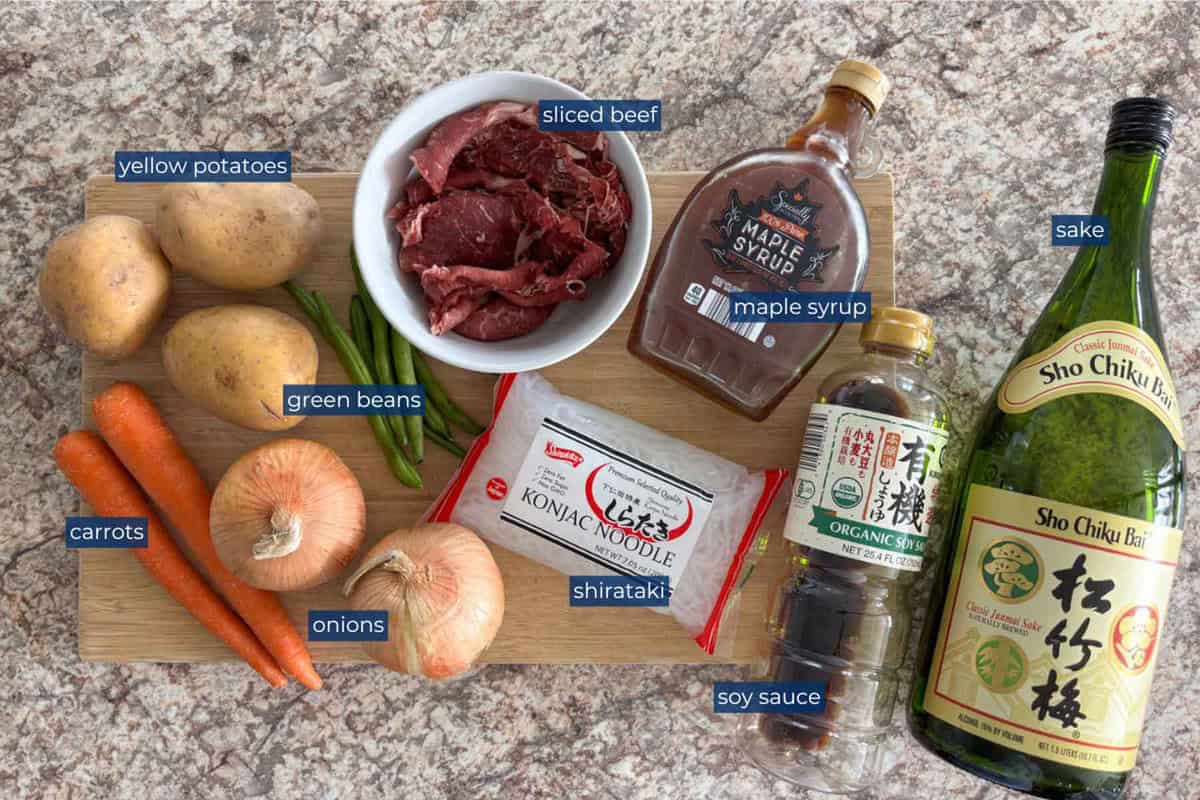
- Sliced Beef: This recipe uses sliced beef, but you can easily swap it with sliced pork or even ground meat. In Japan, beef is more common in western regions, while pork is often used in the east. I also recommend choosing meat with a good balance of fat and lean parts, as it adds more flavor to the dish and helps keep the meat tender.
- Potatoes: I recommend using yellow potatoes because they hold their shape well after simmering, which makes them perfect for this dish. You can mix in other types if you’d like. Russet potatoes are also tasty, but they tend to fall apart more easily as they cook.
- Shirataki: Shirataki are thin, noodle-like strands made from konnyaku (a yam-based food). They soak up flavor beautifully, so I like adding them to nikujaga. When you first open the package, they can have a bit of a smell, but don’t worry, it goes away after boiling. If you don’t have shirataki, you can skip it, but keep in mind it might change how much broth is left at the end. You may want to slightly reduce the amount of seasonings to adjust for that.
- Sake: For the best flavor, use drinking sake. If you’re using cooking sake (which usually contains salt), reduce the soy sauce a bit to balance it out. Sake also helps keep the ingredients, especially the potatoes, from breaking apart as they simmer.
💡You can find these Japanese ingredients at your local Asian grocery store, on Amazon, or through online shops like Weee!
👉If you’re having trouble finding certain ingredients, I wrote an article with Japanese ingredient substitution ideas to help you make it work with what you have.
Variations
- Curry Nikujaga: Add curry powder to nikujaga to spice up the traditional recipe!
- Nikujaga Croquettes: Use leftover nikujaga to make flavorful croquettes by mashing the ingredients (especially the potatoes), shaping them, and deep-frying or air-frying until golden.
- Shio Nikujaga (Salt-Based Nikujaga): You can make nikujaga with salt instead of soy sauce! I recommend using salted kelp (shio kombu) for a light yet savory twist.
An Important Cooking Tool to Make Nikujaga
You’ll need a Japanese cooking tool called an otoshi buta to make nikujaga. It’s a drop lid that helps keep ingredients from moving around too much so they hold their shape and cook evenly in the seasoning.
If you don’t have an otoshi buta, you can find one at some asian grocery stores or online (Amazon usually has them).
Or, you can make a quick DIY version using baking paper: just cut it into a circle slightly smaller than your pot, poke a few small holes to let steam escape, and place it directly on top of the ingredients.
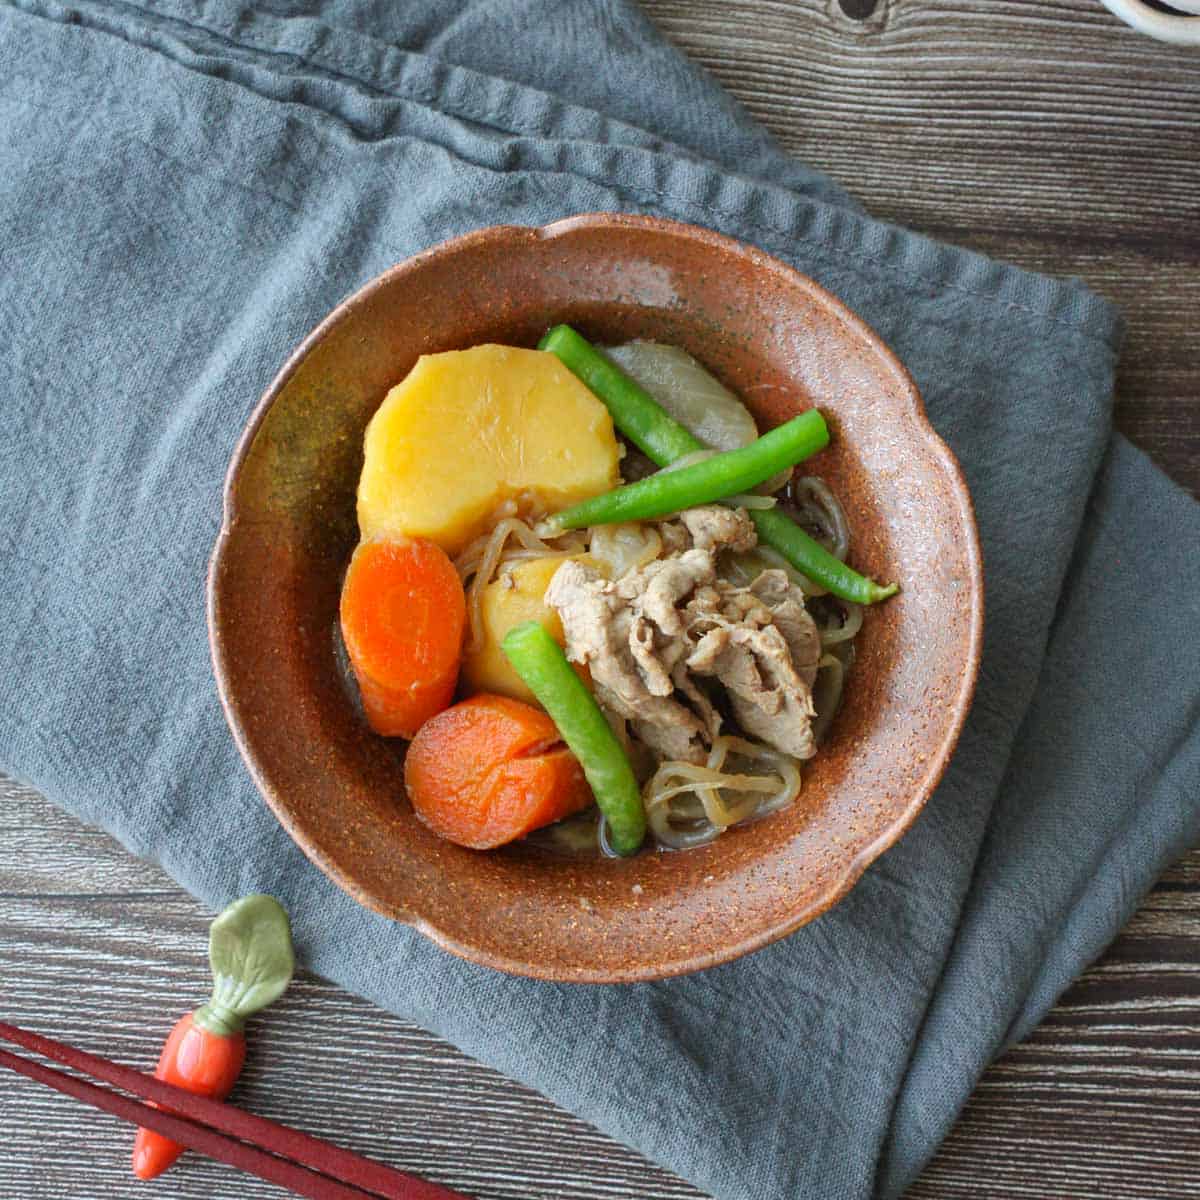
How to Make Nikujaga
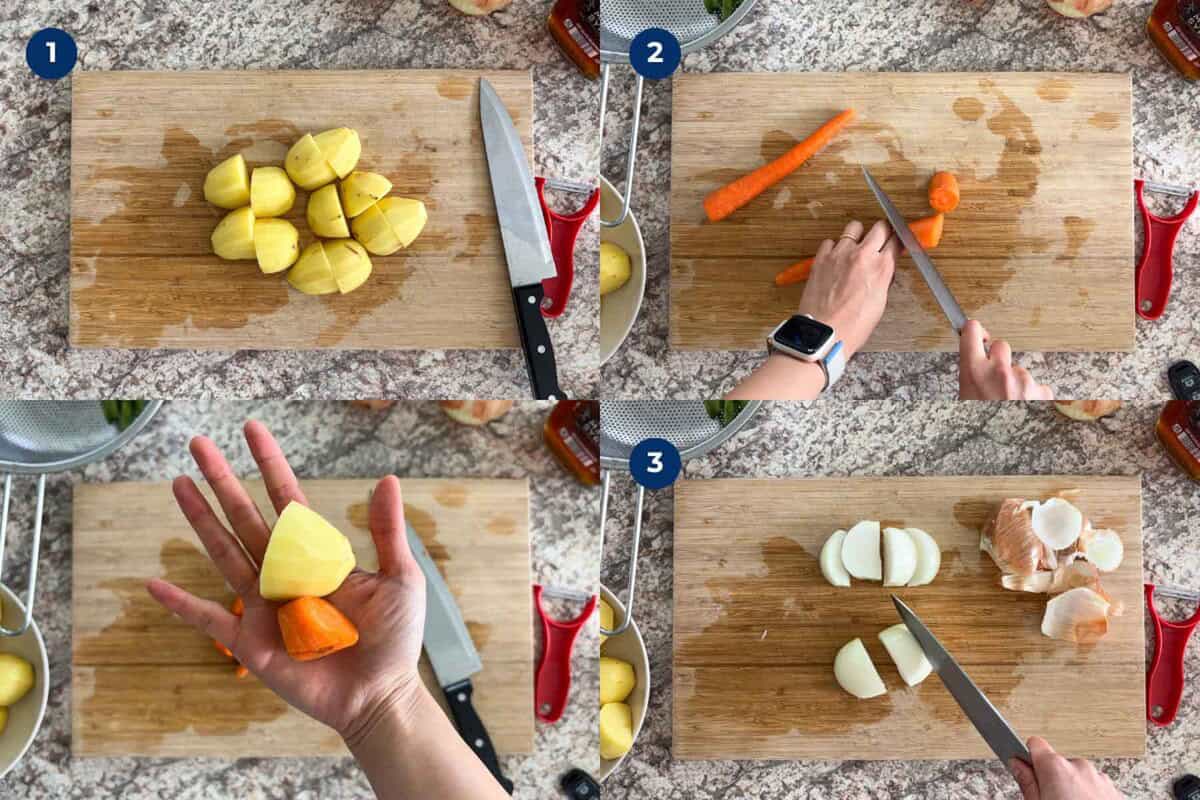
- Peel and cut the potatoes into large bite-sized chunks (about 1.5–2 inches), then soak in water for 5 minutes.
- Cut the carrots slightly smaller than the potatoes (around 1 inch), using the rangiri technique.
- Slice the onion in half, then into 1-inch wedges.
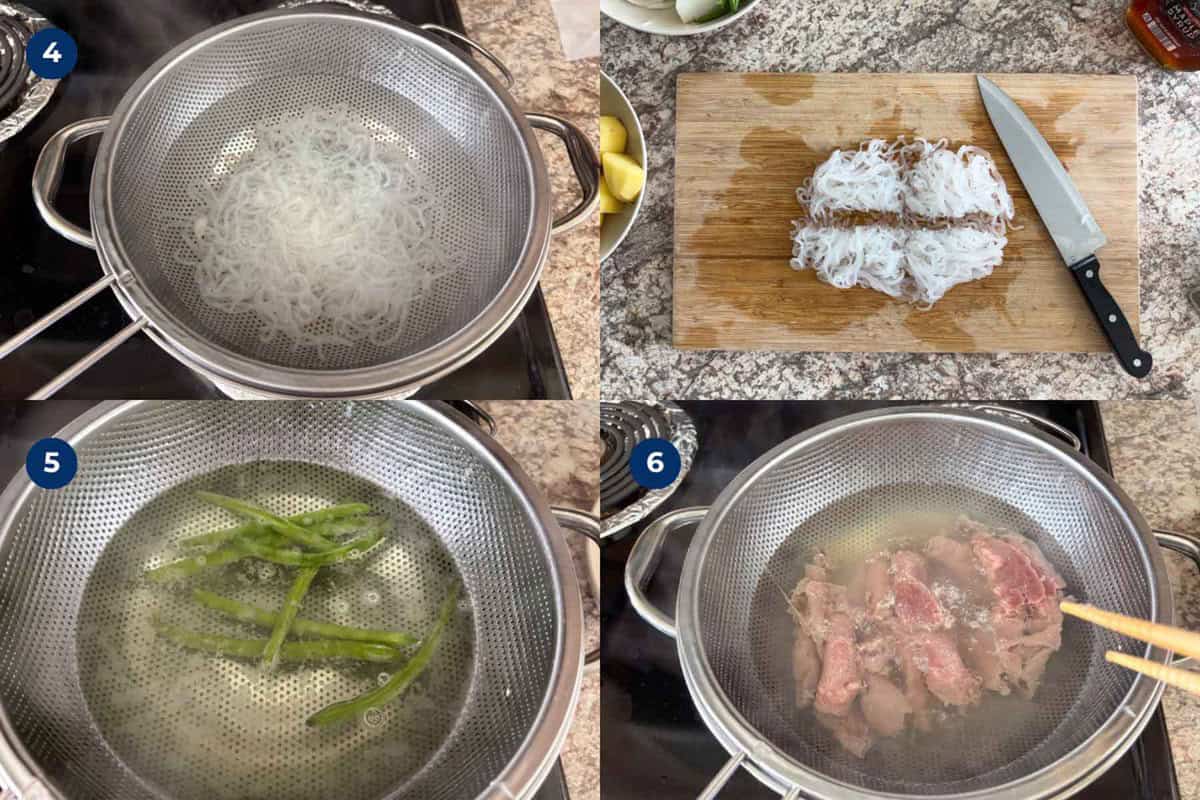
- Boil shirataki for 1 minute, let them cool, spread it on a cutting board into a rectangular shape, then cut into 4 to 6 pieces (no need to be exact, just cut them into manageable lengths).
- Boil green beans or snow peas in the same pot for 1 minute, then cut into 1.5–2 inch pieces.
- Quickly boil the meat in a colander for 10 to 15 seconds until the color changes. Rinse under running water and drain.
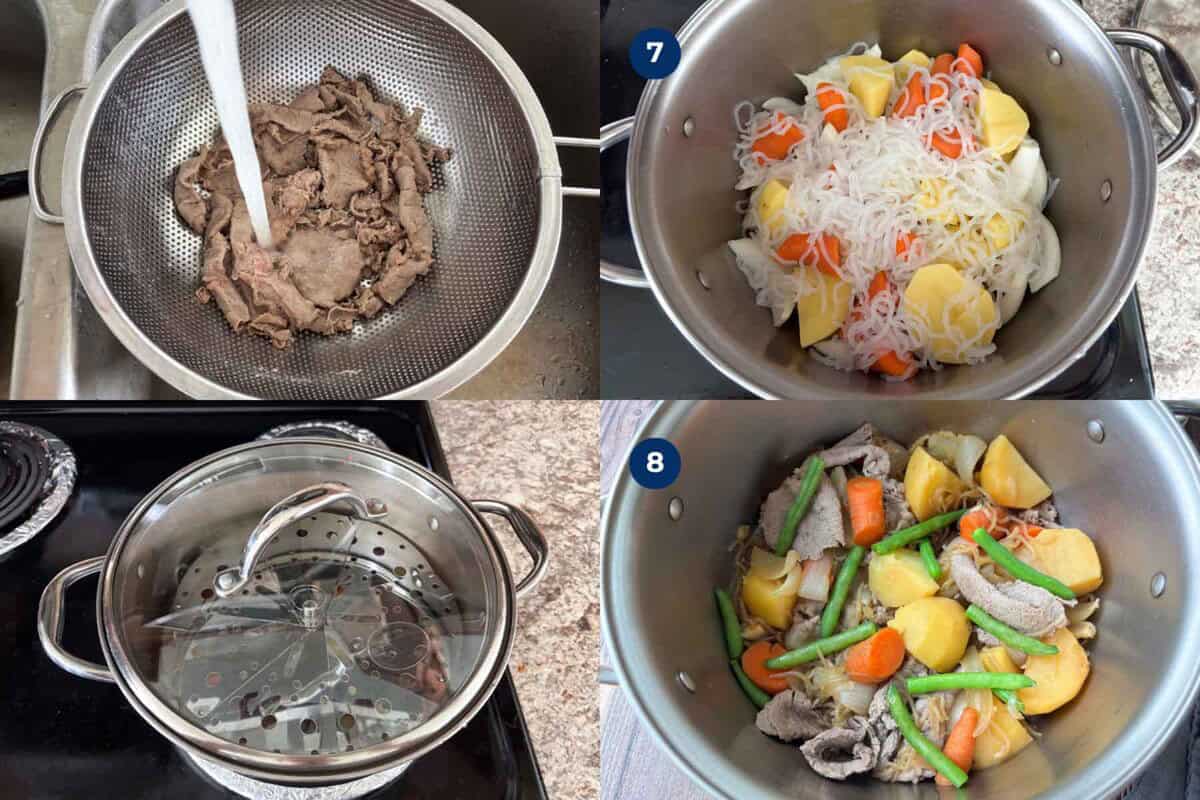
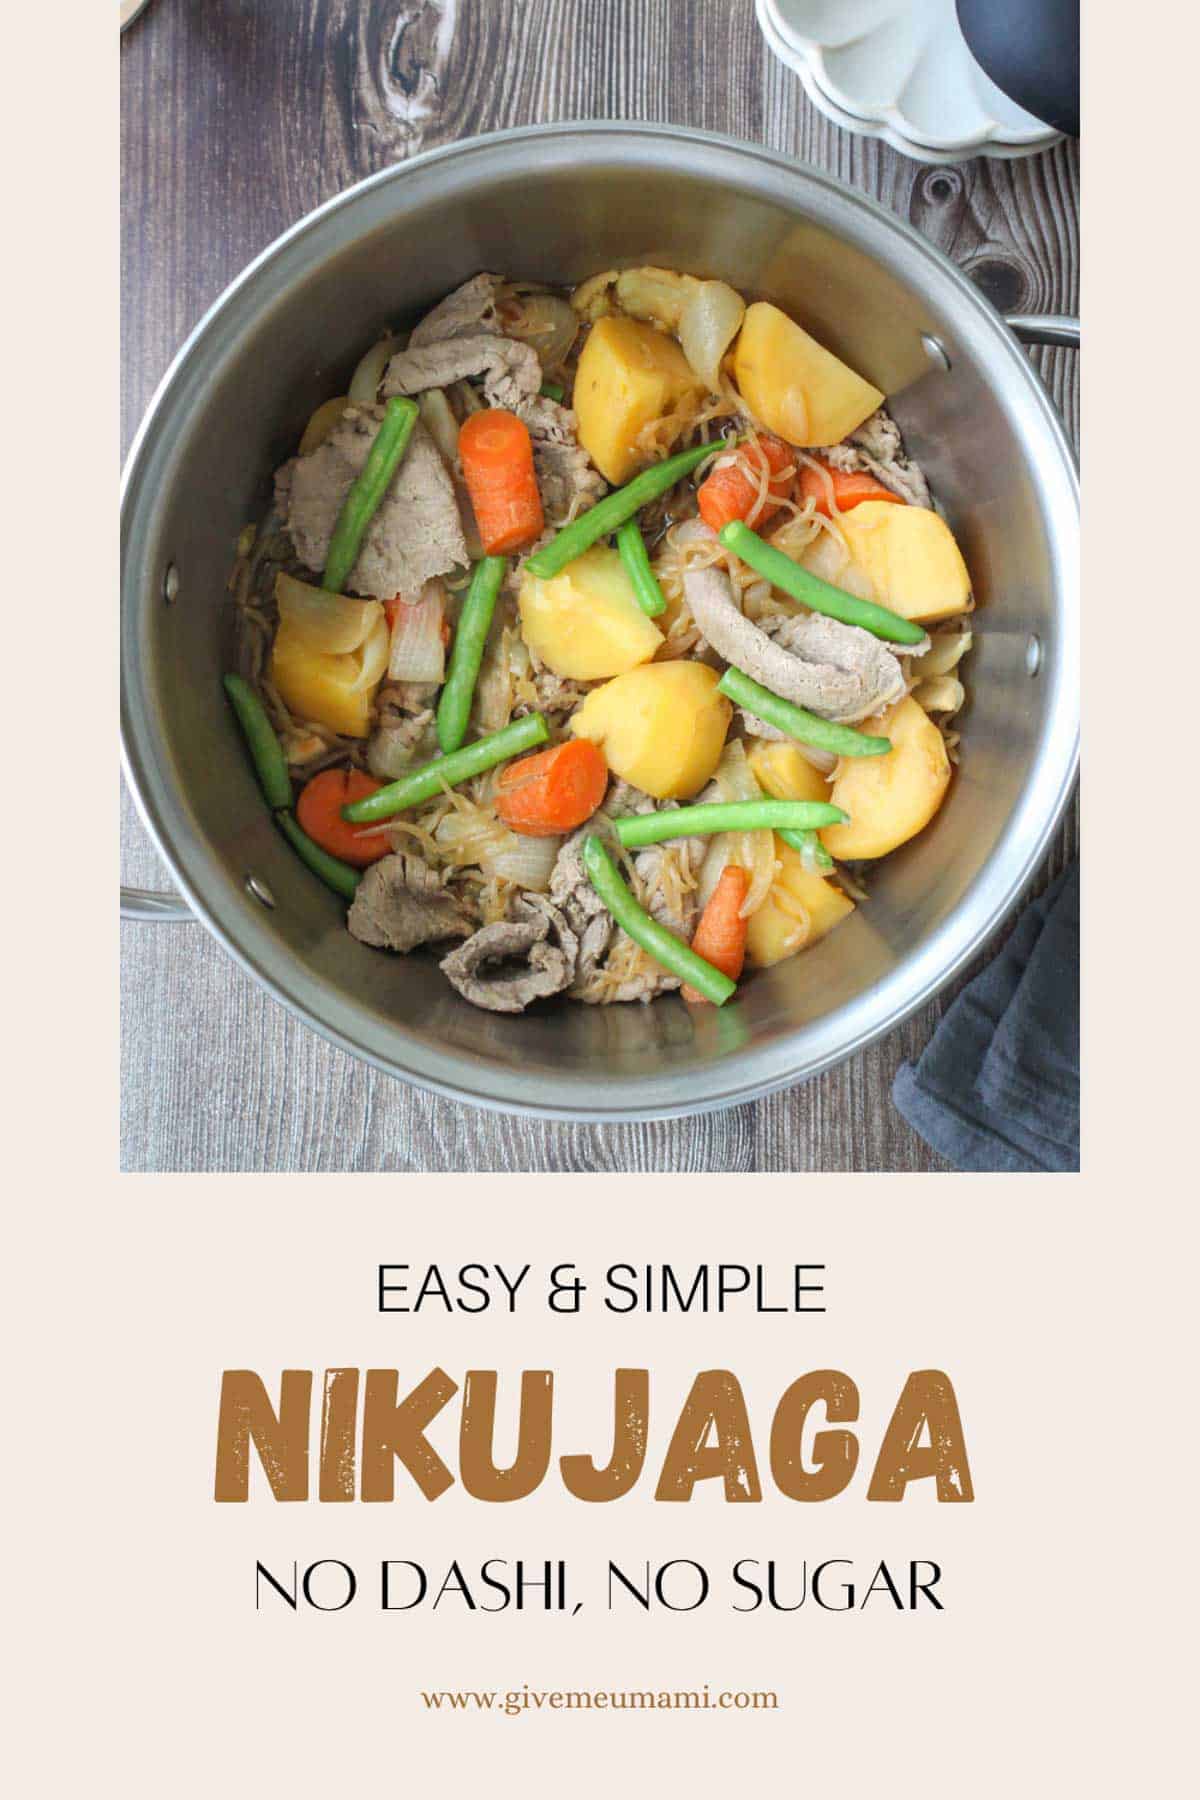
- In the same pot, layer the broth ingredients, onions, potatoes, carrots, and shirataki (in that order). Cover with a vented baking sheet or drop lid (otoshibuta), place a lid on top, and bring to a simmer over medium heat. Once it starts boiling, lower the heat to medium-low and cook for about 20 to 25 minutes.
- Add the meat and the remaining soy sauce, cover again, and simmer for 1 to 2 more minutes. Turn off the heat and add green beans.
Kurumi's Tips
- Add Soy Sauce at the End: Add 1 tablespoon of soy sauce at the end of cooking to keep its rich aroma in the finished dish.
- Use Both Otoshibuta and a Lid: It helps in two big ways:
- It evenly seasons the ingredients with just a small amount of liquid.
- It keeps the moisture inside, so the broth naturally increases without making the ingredients watery.
- Avoid Opening the Lid Too Often: This recipe relies on the moisture from the vegetables. Try not to open the lid while simmering, so the water stays in the pot and the flavors stay concentrated.
- No Need to Trim the Sharp Edges of Vegetables: Some recipes call for mentori (rounding off the corners of chopped vegetables), but it’s not needed here because we use minimal liquid and the veggies won’t fall apart.
- No Need to Stir-Fry the Ingredients First: Older recipes often started by stir-frying the ingredients in oil to add umami, especially when fresh ingredients weren’t as easy to find. But these days, fresh produce is more accessible and flavorful, so you can skip that step and still get a delicious result.
- Use a large pot: This recipe uses just enough liquid to simmer the ingredients, so using a wide pot (about 10 inches) helps everything soak up flavor more evenly. A roomy pot = more surface area = happier potatoes!
- Boil with a colander: If you have a heatproof colander, use it to blanch shirataki and meat (one at a time). Just dunk it into boiling water and lift it out when you’re done, no fishing around or extra mess!
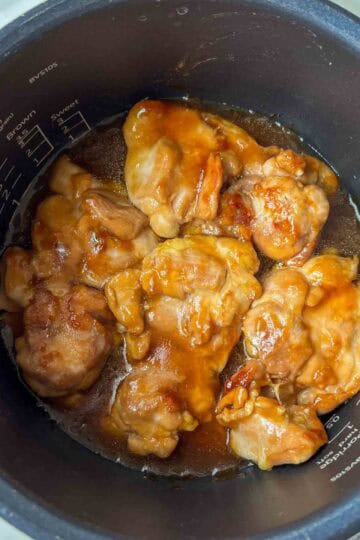
- Use a Rice Cooker: Yes, you can make nikujaga in a rice cooker too! Just follow the same steps (feel free to skip boiling the meat and shirataki if you're feeling lazy like me). Add everything (except the meat) to the rice cooker and use the "Quick Cook" setting for about 20 to 30 minutes, or until the potatoes are tender. Add the meat and the remaining soy sauce, close the lid, and let it cook for another 5 to 8 minutes, or until the meat is cooked through.
What to Serve with Nikujaga
Nikujaga can be enjoyed as a side dish or a main–it just depends on how hungry you are!
Since it has a slightly bold, sweet-and-savory flavor, I recommend pairing it with something fresh, light, and not another simmered dish.
Complete your meal with classic sides like miso soup, sunomono, and sesame spinach salad.
Storage & Reheating Instructions
- To store: Once the nikujaga has cooled, transfer it to an airtight container and keep it in the fridge for up to 3 to 4 days.
- To reheat: If you're just warming up a small portion, the microwave works fine. But if you’re reheating a larger amount, use a pot on the stove to make sure it heats evenly.
- Freezing tips: I don’t recommend freezing nikujaga, since the texture of the potatoes and shirataki can change after freezing. But, if you really want to freeze leftovers, try making it without shirataki and mash the potatoes before freezing. Later, you can repurpose it into nikujaga korokke or nikujaga potato salad!
FAQs
Nikujaga is a Japanese meat and potato stew. Niku means meat, and jaga comes from jagaimo, which means potatoes.
There are a few theories about its origin, but one popular story is that Admiral Heihachiro Togo asked his crew to recreate the beef stew he had while studying in England, and that led to the birth of nikujaga as a shipboard meal.
Yes! I recommend yellow potatoes because they hold their shape well after simmering. You can also mix in other types, like russet potatoes. They soak up flavor nicely, though they do tend to fall apart a bit more.
Absolutely. Sliced pork or ground meat are great alternatives.
For a vegetarian or vegan version, you can use plant-based proteins like soy meat (fillet or ground) or fu (wheat gluten).
More Japanese Main Dish Recipes
Looking for other recipes like this? Try these:

💌 If you tried this recipe and liked it, I’d love to hear from you! Leave a comment and review below, or send a photo of your dish to my email. I’d be so happy to see your creation!
📖Recipe
Nikujaga (Authentic but Easy Japanese Meat & Potato Stew)
Ingredients
Method
- Boil Water (note 1): Bring a large pot of water to a boil. You’ll use it to blanch the shirataki, green beans, and meat.
- Cut Potatoes: Peel and cut 18 ounces yellow potatoes into large bite-sized chunks (about 1.5–2 inches). Soak in water for 5 minutes, then drain. This removes excess starch and keeps the broth clear.
- Cut Carrots: Cut 2 medium carrots a bit smaller than the potatoes (about 1 inch), and if you want to be fancy, use the rangiri technique: cut diagonally, roll the carrot a bit, cut again… repeat. It helps everything cook evenly and look nice.
- Cut Onions: Halve 14 ounces onions, then cut into thick wedges (about 1 inch wide).
- Prep Shirataki (note 2): Drain 7 ounces shirataki in a colander to get rid of the liquid from the package. Boil them for 1 minute to help remove the smell, then take them out, but don’t toss the boiling water just yet!. Let them cool slightly, then spread them out and cut into 4 to 6 shorter pieces. (No need to be exact, just don’t leave them too long.) If your package says “ready to use after rinsing,” you can skip this step.
- Blanch the Veggies (Optional): If you want to level up the dish, blanch the onions, potatoes, and carrots separately for 1 minute each. This helps remove bitterness and any off-tastes. Take them out to a colander to remove excess water.
- Prep the Green Beans: Boil 8 green beans in that same pot for 1 minute, take them out, and chop into 1.5–2 inch pieces.
- Prep the Meat (note 2): Using the same boiling water, cook 7 ounces sliced beef for 10–15 seconds, just until the color changes. Gently separate slices with chopsticks in the water so they don’t clump together. Rinse under cold water quickly and drain well. This removes excess lye and impurities, helping keep the broth clear and clean-tasting.
- Get Your Pot Ready: Drain the pot and give it a quick wipe. Add ½ cup water, 2 tablespoons sake, 1 tablespoon maple syrup, and all but 1 tablespoon of the soy sauce (you’ll use the remaining tablespoon at the end).
- Layer the Ingredients (in this order): Onions → Potatoes → Carrots → Shirataki. This helps everything cook evenly.
- Simmer: Cover with a drop lid (otoshibuta) and your regular lid. Bring to a gentle boil over medium heat. Once boiling, reduce to medium-low and simmer for 20 to 25 minutes, until the potatoes are tender (check with a toothpick). Stir gently from the bottom twice during cooking. Try to keep as many veggies (especially onions) in contact with the broth. Avoid opening the lid too often to keep the steam in.
- Add the Meat and Soy Sauce: Add the cooked meat and the remaining tablespoon of soy sauce. Cover and simmer for 1 to 2 minutes more.
- Finish: Turn off the heat, add the green beans. Gently stir from the bottom, be kind to those soft potatoes or they’ll fall apart!
Notes
- Sliced Beef: You can swap the beef with sliced pork or ground meat.
- Vegetarian/Vegan: Try soy meat or fu (wheat gluten).
- Potatoes: Yellow potatoes hold their shape best. Russets work but might fall apart a bit (still tasty though). Soaking potatoes before simmering helps create a clearer broth and firm texture.
- Shirataki: Adds flavor and texture. If omitting, slightly reduce the seasoning.
- Sake: Drinking sake is best. If using cooking sake (with salt), cut back on soy sauce a bit.
- (Note 1) Use a Large Pot: Since we’re simmering with minimal liquid, a large pot (around 10 inches wide) helps make sure more ingredients are in contact with the broth for better flavor.
- (Note 2) Boil with a Colander: If you have a heatproof colander, it’s super handy! You can place the shirataki and meat (separately) in it and dip it right into the boiling water. Makes it way easier to pull them out quickly without chasing them around the pot.
- Rice Cooker Option: Feeling lazy? Add everything (except the meat) to your rice cooker and use the “Quick Cook” setting for about 20 to 30 minutes, or until the potatoes are tender. Add the meat and the remaining soy sauce, and let it cook for another 5 to 8 minutes until cooked.
- Otoshibuta: You can make a DIY otoshi buta using baking paper. Just cut it into a circle slightly smaller than your pot and poke a few small holes for steam to escape.
- Storage & Reheating Instructions: Keeps well in the fridge for 3 to 4 days. Microwave small portions or reheat on the stove for bigger batches. Not ideal for freezing, but if you do, skip the shirataki and mash the potatoes. Later, turn it into korokke or potato salad!
📌Pin This Recipe For Later!


Kurumi says
I wasn’t always confident making nikujaga. Mine sometimes turned out too watery, even though I prefer fluffy potatoes. That’s why I’m so proud of this recipe! It strikes the perfect balance between simmering and steaming, combining the best of both methods. The veggies turn out soft, flavorful, and perfectly fluffy. We even turned the leftovers into nikujaga croquettes and devoured them too! I hope you love this recipe as much as we do. 😊